If you only think of a shed as a place lawn mowers, tools, kid's toys, holiday decorations, and boxes, prepare to be amazed! A storage shed can be so much more today. Adding a few customizations to a standard shed can transform it into a workshop, a home office, a sales office, a guest room, a man cave, a shed shed... and yes, even a poolside cabana! Today, let's discuss how to customize a 'shed' and turn it into a beautiful backyard building for beside your pool.
Before starting: Check for any local or state codes to may affect you. You are responsible for making sure that your building meets these regulations. Some areas may require a permit. Other areas may require electrical inspections. Homeowner associations often require your building to match your home (siding and colors). These requirements may greatly affect the choices you make when ordering your building and transforming it into a poolside cabana.
Step 1:
First, decide where your new building will be placed and how you intend to use it. Where you place your building in your yard (in reference to your home, pool, fence, trees, etc) will affect the choices your make in the layout of the doors, windows, and other options on your pool shed. How you intend to use it will also determine the customization you should add. Consider:
- Do you want to serve meals/snacks here?
- Do you plan to do a lot of entertaining and want storage space for party supplies?
- Do you want a shaded sitting area under a porch?
- Do you want a private changing area inside?
- Do you want to store pool toys, towels, pool chemicals, or cleaning equipment inside?
- Do you need to have more then one doorway for better flow?
Step 2:
Next, decide on your own level of involvement in the construction process. If you have the skills, you may be able to do many customizations yourself such as finishing the interior, installing light fixtures, or installing built-in shelves/cabinets. If you do not have these skills, you will need to have customizations completed by the manufacturer or hire a handyman for help after your building is delivered.
Step 3:
Now that you know where the building will be located and how you will use it exactly, it's time to design! Consider what upgrades and customizations you will need to add when ordering your new building. You'll also need to determine if you need to have the manufacturer complete these upgrades when building your shed or if you has the skills to do so yourself. You may want to consider these options:
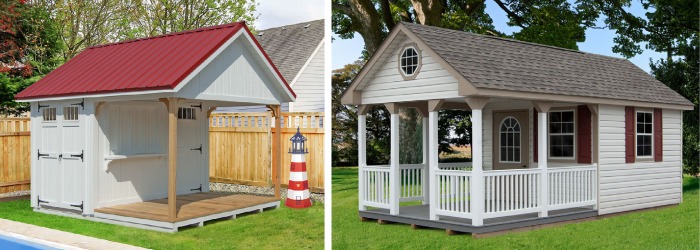
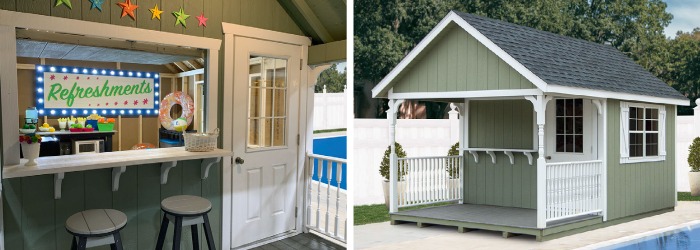
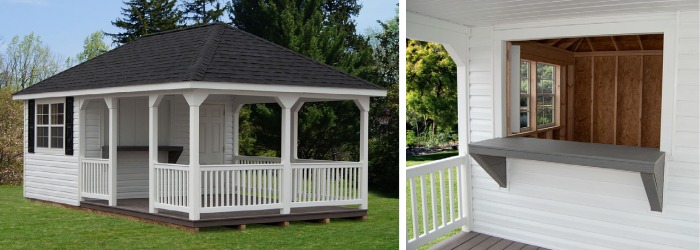
- Add a serving area, like a 5' window with bi-fold doors and a counter. A concession window like this creates a serving area to set up snacks/meals. This option is added to almost every poolside shed we build.
- Turn part of your building into a porch. Porches can also have railing (wood or vinyl) and composite decking for the floor. A porch creates a shaded area for beside your pool to set up chairs or a picnic table. It's a great addition to give your guests a reprieve from the sun and to keep drinks/snacks out of the hot sun. If you choose a flat ceiling (not a cathedral) in the porch area, this can create a loft area inside for a little added storage space. This extra space may come in handy during the winter especially.
- Upgrade the doors to a type with windows. Swapping out standard shed doors for a more traditional house door can really transform a 'shed' into beautiful pool house! Doors with windows allow extra natural light inside and just look more elegant. These doors often include a standard door knob and/or deadbolt for extra security.
- Add a ridge vent, gable end vents, or eave side venting. This is an upgrade we recommend for every cabana! Venting is an essential option needed for any shed with a finished interior. Without proper ventilation, a shed can 'sweat' trying to get the moisture out of the air. You'll see condensation forming and this moisture can cause problems. Venting allows your building to 'breathe' and air to circulate properly preventing condensation from appearing. Even if you do not plan to have a finished interior, venting make a big difference in how hot/humid the interior feels during the summer.
- Separate the building interior into rooms/closets. You may want to split up the space into separate areas such as a private changing area or a closet for storage. We can create partitions/walls or just frame out the rooms (if you intend to finish the interior yourself). If you don't need an actual closet, built in shelves may be to perfect solution for you. Shelves can organize towels and pool toys, while keeping them easy to grab and go.
- Add interior finishing for the walls, ceiling, and floor. Many shed manufacturers can provide some level of interior finishing. You may choose to do it yourself or hire a handyman to complete this task instead. While some owners want stained pine board or shiplap walls inside , others keep it simple and just paint the interior walls and studs with the color of their choice. Keep in mind, the siding type you choice may change the interior look of a shed in it's unfinished state. At Pine Creek Structures, our vinyl siding has an OSB backer while our LP Smart Side includes SmartFinish on the back to give it a cleaner look. Traditional wood board 'n' batten siding gives the interior a beautiful rustic wood look that you may not wish to cover up. If you finish the interior walls, also consider if you want to continue that material up onto the ceiling. Don't forget the floors, too! Some customers choose to have pergo flooring installed while others install a special flooring themselves. Others keep it simple and leave the standard engineered shed floor or just purchase a rug to use inside.
- Consider air conditioning. You may need to add a source of air conditioning to give your family and guests a reprieve from the heat on a warm summer day. If you plan on using a window unit for air conditioning, you may want to install an extra window for this purpose or have a hole cut in the wall and a ledge installed specifically for your unit. Or you may chose to install a ductless mini split unit for both cooling and heating. Some customers choose to have a ceiling fan installed to circulate air. If you choose to include a porch, you may also want a ceiling fan installed there to help create a breeze.
- Insulate the floor, walls, and/or roof. Choose insulated windows and doors. Insulation helps keeps your air conditioning inside. Various kinds of insulation options are available for the flooring, walls, and roofing. A variety of insulated doors and windows are also available.
- Ask about electrical packages. Some DIY-ers are great at finishing the interior themselves, but need help with the electrical components. Most shed builders offer a variety of electrical packages including lights, light switches, receptacles, and/or ceiling fans. Think about any items you intend to use (crock pots, air conditioners, mini fridges, etc) and make sure to include enough outlets in the locations you will need them. Check your local state and township regulations as well, as some regulations require electrical work to be inspected prior to being covered by interior wall finishing.
Step 4:
Once your new building order is placed, prepare the site where it will be placed. Ask your sales representative for any requirements for site preparation. Builders often have minimum requirements in order for a warranty to be valid. At Pine Creek Structures, our sheds must be placed on a foundation of a minimum of 4 inches of 2B stone or the warranty is void. When preparing a site, it must be level. If your building is not level, it's doors and windows will not function properly.
Step 5:
Now that your building is delivered and in place, finish any of the customizations you chose (yourself or through a handyman). Then the real fun begins... It's time to decorate and start using your new poolside cabana! You may choose to:
- Add blinds or curtains to the windows.
- Add a rug inside.
- Place a mini fridge inside stocked with water and other drinks.
- Store your party supplies (drink dispensers, cups, plates, silverware, decorations, etc) inside.
- Organize and store your pool towels or pool toys.
- Organize and safely store your pool cleaning equipment and chemicals.
- Hang decorations inside/outside.
- Place patio furniture nearby or on the porch.
- Add landscaping or potted plants.
Ready to start designing your poolside backyard cabana?
Visit our 'Store Locator' to find your local Pine Creek Structures!